Using Cloudflare Workers and reCAPTCHA v3 for a Static Site Contact Form
Introduction
I recently wrote a blog post that involved using a Cloudflare Worker to serve Brotli 11 compressed HTML rather than the standard uncompressed HTML file. Off the back of this post, I’ve decided to write one about my Cloudflare Worker setup that I use for my Contact Page. In order to stop the spam, I also integrated reCAPTCHA v3 into the form functionality. The form is pretty simple, it asks a visitor for their full name, email address and the message they with to send to me. The Worker then pulls together this information and sends an email to a custom email address that points to my personal email address. This allows me to easily filter messages that come from the site, which I then have the option to reply to if I so wish.
It’s worth noting that this post was heavily inspired by Sia Karamalegos’s post from 2024 about migrating from Netlify to Cloudflare. I had the absolute please of meeting Sia in Amsterdam when I spoke at Performance.now() 2023, she was MC for my talk and I really appreciated her support when I was (quite frankly) freaking out with nerves before the talk!
So why use a serverless endpoint for the contact form? Well, as I’ve mentioned many times before, this blog is a static site built using 11ty and hosted on the Pro plan of Cloudflare Pages. There simply is no backend to point the POST method too, which is required to send the email.
Previous solutions I’ve used
This isn’t the first time I’ve changed the way the contact form works on this blog. I’ve counted 5 alternatives that I have used over the years! Isn’t Git great for tracking history! I certainly wouldn’t be able to remember them all with my terrible memory! So, if you aren’t on Cloudflare, or you would rather not use a Worker for this, then there’s a list of perfectly viable alternatives below:
Netlify Forms
- URL: Netlify Forms
- Cost: Free+ (depending on the Netlify tier you choose)
Netlify Forms is a built-in form handling service for sites hosted on Netlify. It allows you to collect and manage form submissions from static websites without building or maintaining a backend. Submissions can be viewed in the Netlify dashboard or forwarded via email or webhook. I still think it’s a real shame that Cloudflare doesn't offer a form setup that is as easy to integrate and use as Netlify Forms, although, if it did, I wouldn’t need to be writing this blog post!
Cloudflare Pages Functions + MailChannels
- URL: https://developers.cloudflare.com/pages/functions/ & https://www.mailchannels.com/
- Cost: Free plan available ($10+ depending on volume-based pricing)
When I initially migrated from Netlify to Cloudflare for hosting I used this setup, that was until MailChannels sunset its free email sending service for Cloudflare Workers users (me), at that point I started looking for other solutions. As you will see below.
Formspree.io
- URL: https://formspree.io/
- Cost: Free tier available ($15+ a month for paid plans)
Formspree is a hosted form service that lets you collect form submissions without building your own backend server. You simply point your form at Formspree, and it handles sending submissions to your email address or other API endpoints, it comes with built-in spam protection and integrations for various workflows.
Formspark.io (previously Submit Form)
- URL: https://formspark.io/
- Cost: Free tier available ($9+ a month for paid plans)
Formspark is a basic hosted form backend that lets you accept and manage form submissions without the need for your own backend server. You simply submit forms to Formspark, and it stores (or forwards) the data, with options for email notifications, webhooks, and spam filtering.
Botpoison
- URL: https://botpoison.com/
- Cost: Free plan available ($4+ per month depending on bot verifications required)
Botpoison is an invisible anti-spam and bot prevention service for web forms that blocks automated submissions without requiring CAPTCHAs or extra steps from users. It works by analysing form interactions and applying proof-of-work challenges and reputation checks to distinguish human traffic from bots. I started using it when I was still receiving contact form spam from my Formspark.io setup.
Resend
- URL: https://resend.com/
- Cost: Free plan available ($20+ for paid plans)
Resend is a developer-focused email delivery service, providing a simple API and Simple Mail Transfer Protocol (SMTP) interface for sending transactional and broadcast emails from your applications or website. It handles features like deliverability, bounce tracking, suppression lists, and email analytics, so a developer doesn't need to manage email infrastructure themselves and can be integrated with many platforms. Resend is currently part of my email workflow, as I will describe later in the post.
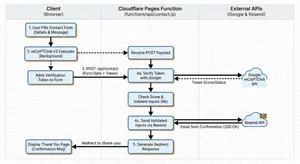
Overview of the setup
My current setup is: Cloudflare Pages Functions (the Worker) + Google reCAPTCHA v3 + Resend for email.
A high-level view of this workflow is:
- User populates the contact form with their details and message
- reCAPTCHA v3 runs and adds a short-lived verification token
- The form POSTs to
/api/contact(via the Pages Function, that sits infunctions/api/contact.jsin the root of my repository - The Pages Function, then:
- verifies the token with Google
- validates the user inputs
- sends the validated inputs via email using Resend
- Redirects the user to the “Thank You” page, confirming that the message has been sent.
Google reCAPTCHA v3
I have to say, out of all the things written in this post, researching about how exactly Google reCAPTCHA v3 works, was probably the most fascinating! I really love the fact that it is all invisible to the user, and it is based on a complex (but logical) scoring mechanism. There’s no need for a really frustrating visual CAPTCHA’s that don’t prove you are human, “they prove that you are American!” (I can’t take credit for this quote, that I believe goes to Terence Eden, or at least that's who I remember reading it from!)
So how exactly does reCAPTCHA v3 decide if you are a human? Well, it turns out it analyses a user's behavioural and contextual signals rather than setting a user a visual challenge, and based on those signals it creates a risk score. The biggest signal comes from how the user behaves on the page.
Behavioural analysis of a user's session
reCAPTCHA observes a number of patterns and metrics from a user's interaction with the page, these include:
- Mouse movement patterns
- Typing speed and rhythm
- Scroll behaviour
- Click timing and placement
- Focus changes between fields or tabs
Us humans are a little messy when using a computer. Our mouse movements curve and wander slightly, we pause without thinking, and our typing comes with the occasional hesitation or uneven rhythm.
Skynet, on the other hand, tends to be a little too perfect. Its mouse paths are often straight, timing is predictable, and its interactions can happen far faster than any real person would manage. Those overly neat patterns are often a strong indicator that automation is at work.
Browser and device fingerprinting
Now, when I think of Browser fingerprinting I often associate it with advertising and companies tracking users across the internet. In all fairness, this is Google we are talking about, so it's very likely that they actually do this! :sad_face:. Browser and device fingerprinting is the way the reCAPTCHA script also examines the environment and device information of where the request is coming from.
Typical signals include:
- Browser version and capabilities
- Installed fonts and plugins
- Screen resolution and device properties
- WebGL and Canvas fingerprint signals
- Cookie availability
- JavaScript execution behaviour
- Timezone of client
- Language settings
You’d be amazed at how accurate these fingerprints can be. Each piece of information adds a little more entropy, meaning it becomes easier to distinguish one device from another. They are so accurate in fact I know many financial sectors or government departments use them for fraud detection.
You really don’t need to look very far to find libraries like Fingerprint that do this all for you! Look at all the information it captured about you just by clicking this link! And you thought cookie tracking was bad!
Note: There are many other fingerprinting libraries available, I’m not specifically targeting Fingerprint.
So while I disagree with browser and device fingerprinting from a privacy and tracking perspective, it does have its uses when it comes to proving that a “user” is a human and not a bot. In particular, bots often run in headless browsers or minimal environments, which look very different from real user devices.
Network and reputation signals
Due to Google’s global network, it can also delve into global reputation data. It captures:
- IP reputation and history
- Known bot networks or proxy usage
- Data centre IP ranges
- Previous abuse patterns linked to the IP or session
So much traffic flows through Googles network globally, it can detect suspicious network traffic surprisingly easily.
Action Context
Google can also score the predicted actions a user is going to make. With reCAPTCHA v3, developers call the library with an action name such as:
login
checkout
signup
comment
From its countless trillions of observations over the years, Google already knows the typical login behaviour for a human (it takes approximately 3–10 seconds). Whereas, a bot can submit hundreds of logins per minute, which is a huge red flag for the use of automation.
Scoring using Machine learning
So what does Google do with all these various signals it captures?
It feeds them into a machine learning algorithm for scoring, which will decide if whatever is interacting is a human or a bot.
| Score | Meaning |
|---|---|
| 0.9 to 1.0 | Very likely human |
| 0.5 | Uncertain |
| 0.0 to 0.3 | Very likely bot |
At this point, it is then up to your backend to decide what to do with the score it gets back. For example:
0.8+  allow request
0.4–0.8 require MFA
<0.4 block or challenge
In my case, the Cloudflare Worker is my simple serverless backend, and it contains the following code to decide if the form submit is from a human or a bot:
// Verify score (reCAPTCHA v3 returns scores between 0.0 and 1.0)
// Lower scores indicate bot-like behavior. 0.5 is a common threshold, but 0.3 allows more legitimate traffic
if (typeof verifyJson.score === "number" && verifyJson.score < 0.3) {
	return new Response(
		JSON.stringify({
			error: "CAPTCHA verification failed",
			details: `Score too low: ${verifyJson.score}`,
		}),
		{ status: 400, headers: { "content-type": "application/json" } },
	);
}
The code above is saying to reject any score that returns from Google that is under 0.3 (Very likely bot), You could of course easily change this threshold if you found it was being too aggressive with the filtering.
Technical setup
To use reCAPTCHA v3, you must first register your site in the Google reCAPTCHA admin console to obtain two keys.
The “site key” is used on the client-side and allows the browser to request a reCAPTCHA verification token for when a user performs an action. The “secret key” must remain server-side and is used to verify that token with Google.
This means storing the secret securely as an environment variable, for my setup this is done via the Cloudflare Pages build dashboard. The Cloudflare Worker then reads it from the environment variables during the build process.
Once all configured, you can also use the Google reCAPTCHA admin console to:
- restrict the key to specific hostnames
- configure score thresholds to control how strict the bot detection should be
The contact form (HTML and client-side)
The HTML used for the form is all pretty standard, just remember to make it as accessible as possible! Semantic markup is the key to achieving this! If you are unsure how to do this, there’s an excellent post called Creating Accessible Forms on the WebAIM.org website. The HTML for my contact form looks like this:
<!--
  Contact form: POSTs to the Cloudflare Pages Function at /api/contact.
  Uses novalidate so we can run custom client-side validation and show
  accessible error messages before and after submit.
-->
<form id="fs-frm" action="/api/contact" method="POST" aria-labelledby="page-title" novalidate>
    <!--
	  Error summary: shown when validation fails (client or server).
	  role="alert" announces to screen readers when content appears.
	  tabindex="-1" allows focus to be moved here after submit for accessibility.
	  hidden by default; JS removes the attribute to reveal and populate it.
	-->
    <div id="form-error-summary" class="form-error-summary" role="alert" tabindex="-1" hidden></div>
    <!--
	  Live region for status updates (e.g. "Sending…", success message).
	  role="status" is polite; screen readers announce changes without interrupting.
	-->
    <div id="form-status" class="form-status" role="status"></div>
    <!--
	  Honeypot (spam trap): invisible to users, attractive to bots.
	  - Wrapped in a div with a neutral class (e.g. "abc") so bots don’t skip it.
	  - aria-hidden="true" keeps it out of the accessibility tree.
	  - tabindex="-1" and autocomplete="off" reduce chance a human touches it.
	  - Obscure name so bots don’t recognise it as a honeypot; server rejects if set.
	-->
    <div class="abc" aria-hidden="true">
        <input type="checkbox" name="_its-a-trap!" tabindex="-1" autocomplete="off" />
    </div>
    <!-- Server/worker uses these hidden fields for redirect and email behaviour -->
    <input type="hidden" name="_redirect" value="/contact/thanks/" />
    <input type="hidden" name="_append" value="false" />
    <input type="hidden" name="_email.subject" value="New Message from Nooshu.com" />
    <fieldset>
        <!-- Legend is required for fieldset; visually-hidden keeps layout clean -->
        <legend class="visually-hidden">Contact form</legend>
        <div class="form-group">
            <label for="name" class="required">Full Name:</label>
            <input type="text" id="name" name="name" autocomplete="name" required />
            <span id="name-error" class="form-error" hidden></span>
        </div>
        <div class="form-group">
            <label for="email" class="required">Email:</label>
            <input type="email" id="email" name="email" autocomplete="email" placeholder="hello@example.com" required />
            <span id="email-error" class="form-error" hidden></span>
        </div>
        <div class="form-group">
            <label for="message" class="required">Message:</label>
            <textarea rows="7" id="message" name="message" required></textarea>
            <span id="message-error" class="form-error" hidden></span>
        </div>
    </fieldset>
    <!--
	  reCAPTCHA v3 token: client-side JS runs grecaptcha.execute() and sets
	  this value before submit. Server verifies the token with Google before
	  sending the email.
	-->
    <input type="hidden" name="g-recaptcha-response" value="" />
    <button type="submit">Send Message</button>
</form>
A version with fewer comments is available in this gist on GitHub (opens in new tab).
The contact form I use above has the following features:
Honeypot and reCAPTCHA to block spam
I’ve already detailed how Google reCAPTCHA works, so I won’t cover it again here, but a Honeypot is a simple first layer of protection. The basic theory behind a Honeypot is a simple form field hidden from real users but still present in the page markup. Bots that scan the source code often fill in every field they find, including this hidden one. If that field is completed, it is a strong signal that the submission came from a bot, not a human because it isn’t seen in the User Interface (UI), thus allowing the request to be rejected immediately.
Client and server validation to ensure safe input
Form validation is handled in two layers:
- On the client side, the form uses
novalidatewith custom JavaScript to check required fields and validate the email format for the name, email, and message inputs. - On the server-side, the API performs its own validation by checking that required fields are present, enforcing max length limits for each field (name: 200 characters, email: 320 characters, message: 5000 characters), and confirming that a valid reCAPTCHA token is included with the submission.
Accessible error handling and focus management
Accessibility is built into the form by clearly associating it with the page title using aria-labelledby, providing an error summary and status regions with role=“alert" plus role=“status", also marking individual fields with aria-invalid and aria-describedby so errors are properly announced.
Inline error messages use matching IDs for assistive technologies, required fields are clearly indicated with a *, and a visually hidden legend describes the <fieldset>. When errors occur, the browser focus moves to the summary using tabindex="-1” so it can be announced immediately by the screen reader.
UX updates to keep the user informed during submission
The form includes the autocomplete attribute for the name and email fields, allowing users browser the option to suggest information already stored in the browser and pre-fill it for them. Additionally, there's a simple placeholder for the email input, letting a user know what input format is expected.
When the form is submitted, the submit button is temporarily disabled and its label changes to “Sending…” while a status message informs the user that their message is being sent. After the submission is successful, the user is then redirected to the /contact/thanks/ page, as seen in the _redirect input field, the API then returns a 303 redirect to complete the process.
Secure server side processing
The form submits a POST request to /api/contact, handled by a Cloudflare function. Hidden fields such as _redirect, _append, and _email.subject control what happens on submit.
On the server, the submission is sent as an email in both HTML and plain text formats before redirecting the user on success. The endpoint only accepts form-encoded or multipart content types. It also verifies the reCAPTCHA token using the CF-Connecting-IP header when available, and validates required fields and length limits, it then escapes HTML in the email body to ensure the content is safe.
I’d like to think this form is pretty accessible and simple to use, but if you disagree, please do let me know. How very meta! It’s always fun to learn something new!
Simplified CSP
The great thing about not having to use a third-party form service for sending contact form emails (besides the slight reduction in cost), is that it simplifies my Content-Security-Policy. This is because I’m no longer having to establish a connection to an additional third-party. The Cloudflare Worker runs on my instance of Cloudflare pages, so it is embedded in the build. And thankfully there’s no client-side interaction when using Resend, as this all happens via the Cloudflare Worker, no modifications to the CSP required! This may not seem like a big thing, but the less you can rely on a third parties the better! There are numerous examples from the history of the web, where the failure of a third party has had a massive impact on the web:
- Fastly outage on 8 June 2021
- Dyn DNS outage (2016)
- Facebook BGP outage (2021)
- Wikipedia Category on Internet outages
An interesting point about the Wikipedia link above is you can see how prominent these outages have become over the decades, and also the fact that the placeholder category pages for the 2030s, 2040s, 2050s, and 2060s are already listed! Oh well, those outages are for my grandkids to worry about! 👴🏼
The Cloudflare Worker (Pages Function)
So let’s get onto the final piece of the puzzle: the Cloudflare Worker code. This file sits in the root of my blog under functions/api/contact.js, this translates to the action="/api/contact” in the form code above.
// Import a small helper that escapes HTML characters.
// This prevents user-supplied content (like the message body)
// from breaking HTML or injecting markup when we render it in the email.
import { escapeHtml } from "../../_helpers/escape-html.js";

// Cloudflare Pages Functions export HTTP handlers as named exports.
// `onRequestPost` will be invoked for POST requests to this function's route.
//
// Signature:
// - `request`: the incoming HTTP Request object
// - `env`: environment bindings (secrets, KV, etc.), configured in Cloudflare
export const onRequestPost = async ({ request, env }) => {
	try {
		// 1. Accept only standard HTML form submissions
		// ------------------------------------------------
		// We support:
		// - application/x-www-form-urlencoded  (classic HTML <form method="post">)
		// - multipart/form-data                (forms that include files)
		//
		// Anything else (JSON, etc.) is rejected with 415 Unsupported Media Type.
		const contentType = request.headers.get("content-type") || "";
		if (
			!contentType.includes("application/x-www-form-urlencoded") &&
			!contentType.includes("multipart/form-data")
		) {
			return new Response(
				JSON.stringify({ error: "Unsupported content type" }),
				{
					status: 415,
					headers: { "content-type": "application/json" },
				},
			);
		}

		// Parse the incoming form body. Cloudflare's Request object
		// exposes a `.formData()` helper which returns a FormData instance.
		const form = await request.formData();

		// 2. Honeypot anti-spam field
		// ------------------------------------------------
		// A "honeypot" is an extra hidden field that humans never fill in,
		// but bots often do. If this field is present and non-empty,
		// we treat it as spam and quietly redirect away.
		if (form.get("_its-a-trap!")) {
			// Redirect back to the homepage. We build the URL from the current request
			// so it works correctly across environments (preview, production, etc.).
			const hpUrl = new URL("/", request.url);
			return Response.redirect(hpUrl.toString(), 303);
		}

		// 3. Extract and normalize form fields
		// ------------------------------------------------
		// We pull out the core fields we care about:
		// - name
		// - email
		// - message
		// - _redirect (optional; where to send the user after success)
		//
		// Every value is coerced to string and trimmed to avoid
		// issues with null/undefined and accidental leading/trailing spaces.
		const name = (form.get("name") || "").toString().trim();
		const email = (form.get("email") || "").toString().trim();
		const message = (form.get("message") || "").toString().trim();
		const redirectUrl = (
			form.get("_redirect") || "/contact/thanks/"
		).toString();

		// Basic required-field validation. If any are empty,
		// respond with a 400 Bad Request and a JSON error.
		if (!name || !email || !message) {
			return new Response(
				JSON.stringify({ error: "Missing required fields" }),
				{
					status: 400,
					headers: { "content-type": "application/json" },
				},
			);
		}

		// 4. Length limits (simple validation / abuse mitigation)
		// ------------------------------------------------
		// These caps are deliberately generous but help avoid:
		// - unrealistic payloads
		// - abuse where the form is used as a data pipe
		if (name.length > 200 || email.length > 320 || message.length > 5000) {
			return new Response(JSON.stringify({ error: "Invalid field lengths" }), {
				status: 400,
				headers: { "content-type": "application/json" },
			});
		}

		// 5. CAPTCHA verification (reCAPTCHA v3 or hCaptcha-compatible)
		// ------------------------------------------------
		// The form is expected to include a CAPTCHA token:
		// - reCAPTCHA v3: `g-recaptcha-response`
		// - (optionally) hCaptcha-style: `h-captcha-response`
		//
		// If no token is present, we immediately reject the submission.
		const recaptchaToken =
			form.get("g-recaptcha-response") || form.get("h-captcha-response");
		if (!recaptchaToken) {
			return new Response(
				JSON.stringify({ error: "reCAPTCHA token is required" }),
				{
					status: 400,
					headers: { "content-type": "application/json" },
				},
			);
		}

		// Select the secret key from Cloudflare environment variables.
		// This must be configured in the project/environment:
		// - RECAPTCHA_SECRET_KEY or
		// - RECAPTCHA_SECRET
		const secret = env.RECAPTCHA_SECRET_KEY || env.RECAPTCHA_SECRET;
		if (!secret) {
			// If the secret is missing, that's a server misconfiguration,
			// so we return a 500 Internal Server Error.
			return new Response(
				JSON.stringify({
					error:
						"Server not configured for CAPTCHA (missing RECAPTCHA_SECRET_KEY/RECAPTCHA_SECRET)",
				}),
				{ status: 500, headers: { "content-type": "application/json" } },
			);
		}

		// For better fraud detection, we also send the user's IP to reCAPTCHA.
		// Cloudflare exposes client IP via:
		// - CF-Connecting-IP header
		// - request.cf.clientAddress
		const remoteIp =
			request.headers.get("CF-Connecting-IP") ||
			request.cf?.clientAddress ||
			null;

		// Build the request body for the reCAPTCHA verification endpoint.
		// It expects application/x-www-form-urlencoded payload.
		const verifyParams = new URLSearchParams({
			secret,
			response: recaptchaToken.toString(),
		});
		if (remoteIp) {
			verifyParams.append("remoteip", remoteIp);
		}

		// POST the verification request to Google's reCAPTCHA API.
		const verifyResp = await fetch(
			"https://www.google.com/recaptcha/api/siteverify",
			{
				method: "POST",
				headers: { "content-type": "application/x-www-form-urlencoded" },
				body: verifyParams,
			},
		);

		// If Google's endpoint itself is failing (network issue or 5xx),
		// treat this as a bad gateway (502) and surface a generic error.
		if (!verifyResp.ok) {
			return new Response(
				JSON.stringify({ error: "Failed to verify reCAPTCHA" }),
				{
					status: 502,
					headers: { "content-type": "application/json" },
				},
			);
		}

		// Parse the JSON response from reCAPTCHA.
		// Example structure:
		// {
		//   success: true/false,
		//   score: 0.0-1.0,
		//   hostname: "example.com",
		//   "error-codes": [...]
		// }
		const verifyJson = await verifyResp.json();

		// 5a. Hard failure: verification not successful at all
		// ------------------------------------------------
		// We return a 400 with details about why it failed where possible.
		if (!verifyJson.success) {
			const errorCodes = verifyJson["error-codes"] || [];
			return new Response(
				JSON.stringify({
					error: "CAPTCHA verification failed",
					details:
						errorCodes.length > 0 ? errorCodes.join(", ") : "Unknown error",
				}),
				{ status: 400, headers: { "content-type": "application/json" } },
			);
		}

		// 5b. Soft failure: low reCAPTCHA v3 score
		// ------------------------------------------------
		// reCAPTCHA v3 uses scores instead of explicit "I'm not a robot" prompts.
		// Lower values are more suspicious. Here we reject anything below 0.3.
		// This threshold is a trade-off between blocking bots and not annoying users.
		if (typeof verifyJson.score === "number" && verifyJson.score < 0.3) {
			return new Response(
				JSON.stringify({
					error: "CAPTCHA verification failed",
					details: `Score too low: ${verifyJson.score}`,
				}),
				{ status: 400, headers: { "content-type": "application/json" } },
			);
		}

		// 5c. Optional hostname verification
		// ------------------------------------------------
		// The reCAPTCHA response includes a `hostname` field.
		// We check that the hostname reCAPTCHA saw matches the hostname of our request.
		// This helps prevent token reuse on other domains.
		const requestHost = new URL(request.url).hostname;
		if (
			verifyJson.hostname &&
			verifyJson.hostname !== requestHost &&
			!requestHost.endsWith(`.${verifyJson.hostname}`)
		) {
			// We allow subdomains (e.g. www.example.com vs example.com),
			// but log any unexpected mismatch to server logs for later inspection.
			// This log will show up in Cloudflare function logs.
			console.warn(
				`reCAPTCHA hostname mismatch: expected ${requestHost}, got ${verifyJson.hostname}`,
			);
		}

		// 6. Prepare email content for Resend
		// ------------------------------------------------
		// At this point, the submission has passed:
		// - basic validation
		// - anti-spam honeypot
		// - CAPTCHA checks
		//
		// Now we build an email to send to the site owner via Resend.

		// Fixed "from" address used with Resend.
		// This should be a verified sender domain for your Resend account.
		const fromEmail = "contact@example.com";

		// Allow the subject to be overridden via a hidden form field `_email.subject`,
		// otherwise fall back to a sensible default.
		const subject =
			form.get("_email.subject")?.toString() || "New Message from Nooshu.com";

		// Plain-text body, which is useful for mail clients that don't render HTML, note the use of JavaScript Template literals.
		const textBody = `New contact form submission on nooshu.com

Name: ${name}
Email: ${email}

Message:
${message}`;

		// HTML body with simple markup for better readability.
		// We escape all user-supplied fields to avoid injecting HTML or scripts.
		const htmlBody = `<h2>New contact form submission on nooshu.com</h2><p><strong>Name:</strong> ${escapeHtml(
			name,
		)}<br/><strong>Email:</strong> ${escapeHtml(email)}</p><p><strong>Message:</strong></p><pre style="white-space:pre-wrap">${escapeHtml(
			message,
		)}</pre>`;

		// Pull the Resend API key from Cloudflare environment variables.
		// This must be configured as a secret in the Pages project.
		const apiKey = env.RESEND_API_KEY;
		if (!apiKey) {
			return new Response(
				JSON.stringify({
					error: "Server not configured for email (missing RESEND_API_KEY)",
				}),
				{ status: 500, headers: { "content-type": "application/json" } },
			);
		}

		// 7. Call Resend's email API
		// ------------------------------------------------
		// We issue a POST request to Resend's /emails endpoint with:
		// - from: sender (must be a verified domain)
		// - to: recipient(s) (in this case, the site inbox)
		// - reply_to: the visitor's email address, so "Reply" in your mail client goes to them
		// - subject, text, html: the message content
		const resendResp = await fetch("https://api.resend.com/emails", {
			method: "POST",
			headers: {
				"content-type": "application/json",
				Authorization: `Bearer ${apiKey}`,
			},
			body: JSON.stringify({
				from: `Nooshu Contact <${fromEmail}>`,
				to: ["email@example.com"],
				reply_to: email,
				subject,
				text: textBody,
				html: htmlBody,
			}),
		});

		// If Resend returns a non-2xx status, we surface a 502 to the client
		// and include the raw error body for easier debugging.
		if (!resendResp.ok) {
			const text = await resendResp.text();
			return new Response(
				JSON.stringify({ error: "Email send failed", details: text }),
				{
					status: 502,
					headers: { "content-type": "application/json" },
				},
			);
		}

		// 8. Final redirect on success
		// ------------------------------------------------
		// If everything above succeeds, we redirect the user to a "thank you"
		// page (configurable via the `_redirect` field).
		//
		// We resolve `redirectUrl` relative to the current request URL
		// to avoid hard-coding the origin.
		const finalRedirect = new URL(redirectUrl, request.url);

		// 303 See Other is the canonical way to redirect after a POST,
		// telling the browser to perform a GET to the new URL.
		return Response.redirect(finalRedirect.toString(), 303);
	} catch (err) {
		// 9. Global error handler
		// ------------------------------------------------
		// If anything unexpected blows up (network issues, runtime errors, etc.),
		// we catch it here and return a generic 500 JSON response.
		//
		// The error is stringified so it's at least inspectable in logs / responses,
		// but in a real-world scenario you might want to avoid leaking details
		// to the client and instead only log them server-side.
		return new Response(
			JSON.stringify({ error: "Server error", details: String(err) }),
			{
				status: 500,
				headers: { "content-type": "application/json" },
			},
		);
	}
};
A version with fewer comments is available in this gist on GitHub (opens in new tab).
Using Cloudflare Turnstile
After I posted the blog post on Bluesky, Mastodon, and LinkedIn, I had a couple of replies back asking me why I hadn't used Cloudflare's CAPTCHA integration rather than Google's ReCAPTCHA v3. In all honesty I didn't realise Cloudflare had a competing product! So, thanks to Ryan Townsend and Paweł Grzybek for letting me know!
I'm not going to be rewriting the whole blog post, but what I will do is share the client-side JavaScript code (turnstile.js), and the contact.js file for the API that I am using to integrate with Cloudflare Turnstile. Also, any additional changes I had to make.
First the Code:
// Lightweight, dependency-free integration for Cloudflare Turnstile.
// This script:
// - Validates the contact form on the client (for UX only – server still re-validates).
// - Requests an invisible Turnstile token just before submit.
// - Injects the token into a hidden field for the server to verify.
// - Tries hard not to block the user if Turnstile is slow to load.
(function () {
  // Public Turnstile site key for this widget. This is *not* a secret.
  // The matching secret key lives on the server and is used during
  // server-side verification in the Cloudflare Pages Function.
  const SITE_KEY = "0x4AAAAAACpYvR2v9J0i1tr_";

  // The contact form we progressively enhance. If it does not exist
  // (for example, on other pages), bail out early.
  const form = document.getElementById("fs-frm");
  if (!form) return;

  // ---------------------------------------------------------------------------
  // Hidden token field management
  // ---------------------------------------------------------------------------
  // Turnstile posts its token back to the server in a field that we choose.
  // The backend expects this exact name when validating the submission.
  const tokenInputName = "cf-turnstile-response";
  let tokenInput = form.querySelector(`input[name="${tokenInputName}"]`);
  if (!tokenInput) {
    // If the hidden field was not rendered server-side, create it here.
    tokenInput = document.createElement("input");
    tokenInput.type = "hidden";
    tokenInput.name = tokenInputName;
    form.appendChild(tokenInput);
  }

  // ---------------------------------------------------------------------------
  // Accessible error + status UI helpers
  // ---------------------------------------------------------------------------
  const errorSummary = document.getElementById("form-error-summary");
  const formStatus = document.getElementById("form-status");

  // Show a high-level error message above the form and move focus there so
  // screen-reader users (and keyboard users) are notified.
  function showFormError(message) {
    if (errorSummary) {
      errorSummary.textContent = message;
      errorSummary.hidden = false;
      errorSummary.focus();
    }
  }

  // Hide and clear the error summary.
  function clearFormError() {
    if (errorSummary) {
      errorSummary.textContent = "";
      errorSummary.hidden = true;
    }
  }

  // Attach error state to a single field (ARIA attributes + inline message).
  function showFieldError(fieldId, message) {
    const field = document.getElementById(fieldId);
    const errorEl = document.getElementById(fieldId + "-error");
    if (field) {
      field.setAttribute("aria-invalid", "true");
      field.setAttribute("aria-describedby", fieldId + "-error");
    }
    if (errorEl) {
      errorEl.textContent = message;
      errorEl.hidden = false;
    }
  }

  // Clear error state from a single field.
  function clearFieldError(fieldId) {
    const field = document.getElementById(fieldId);
    const errorEl = document.getElementById(fieldId + "-error");
    if (field) {
      field.removeAttribute("aria-invalid");
      field.removeAttribute("aria-describedby");
    }
    if (errorEl) {
      errorEl.textContent = "";
      errorEl.hidden = true;
    }
  }

  // Clear all per-field and summary errors.
  function clearAllErrors() {
    clearFormError();
    ["name", "email", "message"].forEach(clearFieldError);
  }

  // Set a small, live-updating status message (polite ARIA live region).
  function setStatus(message) {
    if (formStatus) {
      formStatus.textContent = message;
    }
  }

  // ---------------------------------------------------------------------------
  // Client-side validation
  // ---------------------------------------------------------------------------
  // This mirrors the server’s validation rules, but is *only* for UX.
  // The server still validates everything again.
  function validateForm() {
    clearAllErrors();
    const errors = [];
    const nameField = form.querySelector("#name");
    const emailField = form.querySelector("#email");
    const messageField = form.querySelector("#message");

    if (!nameField.value.trim()) {
      showFieldError("name", "Please enter your full name.");
      errors.push(nameField);
    }

    if (!emailField.value.trim()) {
      showFieldError("email", "Please enter your email address.");
      errors.push(emailField);
    } else if (!/^[^\s@]+@[^\s@]+\.[^\s@]+$/.test(emailField.value.trim())) {
      showFieldError("email", "Please enter a valid email address.");
      errors.push(emailField);
    }

    if (!messageField.value.trim()) {
      showFieldError("message", "Please enter a message.");
      errors.push(messageField);
    }

    if (errors.length > 0) {
      const summary =
        errors.length === 1
          ? "There is 1 error in the form."
          : "There are " + errors.length + " errors in the form.";
      showFormError(summary);
      errors[0].focus();
      return false;
    }

    return true;
  }

  // ---------------------------------------------------------------------------
  // Turnstile widget lifecycle
  // ---------------------------------------------------------------------------
  // `widgetId` is the handle returned by turnstile.render.
  // `pendingSubmit` tracks whether we should submit once a token arrives.
  // `submitButton` lets us disable / re-enable the call-to-action button.
  let widgetId = null;
  let pendingSubmit = false;
  let submitButton = null;

  // Called by Turnstile when a token is successfully generated.
  function onTokenReceived(token) {
    tokenInput.value = token;
    // If the user was waiting for the challenge to finish, we can now submit.
    if (pendingSubmit) {
      pendingSubmit = false;
      form.submit();
    }
  }

  // Called when Turnstile hits an error or we decide the widget is unavailable.
  function onTokenError(errorCode) {
    tokenInput.value = "";
    pendingSubmit = false;
    setStatus("");
    console.error("Turnstile error:", errorCode);
    showFormError(
      "Verification failed. Please try again. If you use an ad blocker, you may need to allow Cloudflare on this site."
    );
    if (submitButton) {
      submitButton.disabled = false;
      submitButton.textContent = "Send Message";
    }
    // If we have a widget instance, reset it so the user can try again.
    if (widgetId !== null && typeof turnstile !== "undefined") {
      turnstile.reset(widgetId);
    }
  }

  // Render an invisible Turnstile widget into the placeholder div.
  // The widget itself is not visible – it will run when we call execute().
  function renderTurnstile() {
    const container = document.getElementById("turnstile-container");
    // Only render once, and only on the contact page where the container exists.
    if (!container || widgetId !== null) return;

    if (typeof turnstile !== "undefined") {
      widgetId = turnstile.render(container, {
        sitekey: SITE_KEY,
        // Invisible mode: no explicit checkbox; Cloudflare decides when
        // to prompt for a challenge, if at all.
        size: "invisible",
        // We want full control, so we manually call turnstile.execute(widgetId).
        execution: "execute",
        callback: onTokenReceived,
        "error-callback": onTokenError,
        "expired-callback": function () {
          // Expired tokens are treated as missing; the server will reject them.
          tokenInput.value = "";
        },
      });
    }
  }

  // Wait until the Turnstile script has loaded and the global `turnstile`
  // object is available. We poll for a short period so that a slow network
  // does not permanently block the user.
  function waitForTurnstile() {
    return new Promise((resolve) => {
      if (typeof turnstile !== "undefined") {
        resolve();
        return;
      }
      let attempts = 0;
      const checkInterval = setInterval(() => {
        attempts++;
        if (typeof turnstile !== "undefined") {
          clearInterval(checkInterval);
          resolve();
        } else if (attempts > 100) {
          // Give up after ~10s. At this point we will try to submit
          // without a token and let the server return a clear error.
          clearInterval(checkInterval);
          resolve();
        }
      }, 100);
    });
  }

  // As soon as the page is ready and Turnstile is (hopefully) loaded,
  // render the widget so it is ready by the time the user hits submit.
  waitForTurnstile().then(() => {
    renderTurnstile();
  });

  // ---------------------------------------------------------------------------
  // Submit flow
  // ---------------------------------------------------------------------------
  form.addEventListener("submit", async function (e) {
    // We always take over submission so we can validate + get a token first.
    e.preventDefault();

    if (!validateForm()) return;

    submitButton = form.querySelector('button[type="submit"]');
    if (submitButton) {
      submitButton.disabled = true;
      submitButton.textContent = "Sending…";
    }
    setStatus("Verifying, please wait.");

    // Make sure the Turnstile library has had a chance to load.
    await waitForTurnstile();

    // If we still do not have a widget, try to render one and give the
    // browser a short moment to paint it.
    if (widgetId === null) {
      renderTurnstile();
      await new Promise((resolve) => setTimeout(resolve, 100));
    }

    // If for some reason we already have a valid token (for example,
    // Turnstile auto-ran earlier), we can just submit the form.
    if (tokenInput.value) {
      form.submit();
      return;
    }

    // Normal path: ask Turnstile to run in invisible mode. When it finishes,
    // it will call onTokenReceived, which will submit the form if
    // `pendingSubmit` is true.
    if (widgetId !== null && typeof turnstile !== "undefined") {
      pendingSubmit = true;
      turnstile.execute(widgetId);
    } else {
      // We could not talk to Turnstile at all – surface a clear error.
      console.error("Turnstile widget not available");
      onTokenError("widget-not-available");
    }
  });
})();
A version with fewer comments is available in this gist on GitHub (opens in new tab).
Now the updates to the contact.js file that sits in functions/api/ directory.
import { escapeHtml } from '../../_helpers/escape-html.js';

/**
 * Cloudflare Pages Function that powers the contact form.
 *
 * High‑level flow (perfect for a blog diagram):
 *
 * 1. Accept a classic `<form>` POST (urlencoded or multipart).
 * 2. Validate the payload on the server (required fields + length limits).
 * 3. Verify a Cloudflare Turnstile token server‑side.
 * 4. Send a notification email via Resend (HTTPS API call).
 * 5. Redirect the user to a static “thanks” page.
 *
 * The matching HTML form does *not* need JavaScript – the worker stands on its
 * own. Client‑side JS (for validation + Turnstile widget) is purely a UX bonus.
 */
export const onRequestPost = async ({ request, env }) => {
	try {
		// ---------------------------------------------------------------------
		// 1. Only accept traditional browser form submissions
		// ---------------------------------------------------------------------
		// The contact page posts using `application/x-www-form-urlencoded`, but
		// we also support `multipart/form-data` so the handler works with
		// progressive enhancement and file inputs if they ever appear.
		const contentType = request.headers.get('content-type') || '';
		if (!contentType.includes('application/x-www-form-urlencoded') && !contentType.includes('multipart/form-data')) {
			return new Response(JSON.stringify({ error: 'Unsupported content type' }), {
				status: 415,
				headers: { 'content-type': 'application/json' },
			});
		}

		// This gives us a `FormData` instance regardless of which of the two
		// encodings the browser chose.
		const form = await request.formData();

		// ---------------------------------------------------------------------
		// 2. Honeypot – cheap, early bot filter
		// ---------------------------------------------------------------------
		// The form includes a visually hidden checkbox with this wonderfully
		// ugly name. Real users never see or tick it, but naive bots often
		// will. If it has a value, we quietly redirect back to the homepage.
		if (form.get('_its-a-trap!')) {
			const hpUrl = new URL('/', request.url);
			return Response.redirect(hpUrl.toString(), 303);
		}

		const name = (form.get('name') || '').toString().trim();
		const email = (form.get('email') || '').toString().trim();
		const message = (form.get('message') || '').toString().trim();
		const redirectUrl = (form.get('_redirect') || '/contact/thanks/').toString();

		// ---------------------------------------------------------------------
		// 3. Field‑level validation (server‑side, regardless of JS on client)
		// ---------------------------------------------------------------------
		if (!name || !email || !message) {
			return new Response(JSON.stringify({ error: 'Missing required fields' }), {
				status: 400,
				headers: { 'content-type': 'application/json' },
			});
		}

		// Upper bounds on field length keep logs and emails sane and protect
		// downstream services from unexpectedly huge payloads.
		if (name.length > 200 || email.length > 320 || message.length > 5000) {
			return new Response(JSON.stringify({ error: 'Invalid field lengths' }), {
				status: 400,
				headers: { 'content-type': 'application/json' },
			});
		}

		// ---------------------------------------------------------------------
		// 4. Verify Cloudflare Turnstile token (server‑side)
		// ---------------------------------------------------------------------
		// The front‑end Turnstile widget places its token into
		// `cf-turnstile-response`. Without a token, we *always* reject the
		// submission – even if the rest of the payload looks valid.
		const turnstileToken = form.get('cf-turnstile-response');
		if (!turnstileToken) {
			return new Response(JSON.stringify({ error: 'Turnstile token is required' }), {
				status: 400,
				headers: { 'content-type': 'application/json' },
			});
		}

		// The Turnstile secret is never exposed to the client – it lives in
		// Cloudflare Pages environment variables.
		const secret = env.TURNSTILE_SECRET_KEY;
		if (!secret) {
			return new Response(
				JSON.stringify({
					error: 'Server not configured for CAPTCHA (missing TURNSTILE_SECRET_KEY)',
				}),
				{ status: 500, headers: { 'content-type': 'application/json' } }
			);
		}

		// Including the remote IP is optional but recommended; it gives
		// Turnstile a little more context when scoring the request.
		const remoteIp = request.headers.get('CF-Connecting-IP') || request.cf?.clientAddress || null;

		const verifyBody = {
			secret,
			response: turnstileToken.toString(),
		};
		if (remoteIp) {
			verifyBody.remoteip = remoteIp;
		}

		const verifyResp = await fetch('https://challenges.cloudflare.com/turnstile/v0/siteverify', {
			method: 'POST',
			headers: { 'content-type': 'application/json' },
			body: JSON.stringify(verifyBody),
		});

		if (!verifyResp.ok) {
			return new Response(JSON.stringify({ error: 'Failed to verify Turnstile' }), {
				status: 502,
				headers: { 'content-type': 'application/json' },
			});
		}

		const verifyJson = await verifyResp.json();

		// If Turnstile says “no”, do not send an email – fail fast here.
		if (!verifyJson.success) {
			const errorCodes = verifyJson['error-codes'] || [];
			return new Response(
				JSON.stringify({
					error: 'CAPTCHA verification failed',
					details: errorCodes.length > 0 ? errorCodes.join(', ') : 'Unknown error',
				}),
				{ status: 400, headers: { 'content-type': 'application/json' } }
			);
		}

		// Optional defence‑in‑depth check: ensure the token we received was
		// minted for this hostname (or one of its subdomains).
		const requestHost = new URL(request.url).hostname;
		if (
			verifyJson.hostname &&
			verifyJson.hostname !== requestHost &&
			!requestHost.endsWith(`.${verifyJson.hostname}`)
		) {
			console.warn(`Turnstile hostname mismatch: expected ${requestHost}, got ${verifyJson.hostname}`);
		}

		// ---------------------------------------------------------------------
		// 5. Build notification email payload for Resend
		// ---------------------------------------------------------------------
		// `fromEmail` must be a sender you control and have verified with Resend.
		const fromEmail = 'email@example.com';
		const subject = form.get('_email.subject')?.toString() || 'New Message from Nooshu.com';

		const textBody = `New contact form submission on nooshu.com\n\nName: ${name}\nEmail: ${email}\n\nMessage:\n${message}`;
		const htmlBody = `<h2>New contact form submission on nooshu.com</h2><p><strong>Name:</strong> ${escapeHtml(name)}<br/><strong>Email:</strong> ${escapeHtml(email)}</p><p><strong>Message:</strong></p><pre style="white-space:pre-wrap">${escapeHtml(message)}</pre>`;

		// Resend API key comes from Cloudflare Pages environment variables,
		// never from the client or build‑time `.env`.
		const apiKey = env.RESEND_API_KEY;
		if (!apiKey) {
			return new Response(
				JSON.stringify({
					error: 'Server not configured for email (missing RESEND_API_KEY)',
				}),
				{ status: 500, headers: { 'content-type': 'application/json' } }
			);
		}

		// Call the Resend REST API. In this project we make a single,
		// straightforward `emails` call – no templates, CC/BCC, or attachments.
		const resendResp = await fetch('https://api.resend.com/emails', {
			method: 'POST',
			headers: {
				'content-type': 'application/json',
				Authorization: `Bearer ${apiKey}`,
			},
			body: JSON.stringify({
				from: `Nooshu Contact <${fromEmail}>`,
				to: ['email@example.com'],
				reply_to: email,
				subject,
				text: textBody,
				html: htmlBody,
			}),
		});

		if (!resendResp.ok) {
			const text = await resendResp.text();
			return new Response(JSON.stringify({ error: 'Email send failed', details: text }), {
				status: 502,
				headers: { 'content-type': 'application/json' },
			});
		}

		// ---------------------------------------------------------------------
		// 6. Redirect to “thanks” page
		// ---------------------------------------------------------------------
		// Using a 303 ensures the follow‑up request is a GET, which means
		// browser refreshes do not re‑POST the form.
		const finalRedirect = new URL(redirectUrl, request.url);
		return Response.redirect(finalRedirect.toString(), 303);
	} catch (err) {
		return new Response(JSON.stringify({ error: 'Server error', details: String(err) }), {
			status: 500,
			headers: { 'content-type': 'application/json' },
		});
	}
};
A version with fewer comments is available in this gist on GitHub (opens in new tab).
Amazingly, that's really the only two major changes!
The minor changes were:
- Footer template: Update my footer with a link to the JavaScript above and the Turnstile JavaScript, e.g.
https://challenges.cloudflare.com/turnstile/v0/api.js. - CSP: Modified my
_headersfile to remove Google from my CSP and add in the challenges URL (https://challenges.cloudflare.com/) to theconnect-src,script-src-elem, andframe-src. - CSS: Slightly modify the CSS to remove Google ReCAPTCHA v3 specific styling (
.grecaptcha-badge) and add Turnstile CSS (.turnstile-widget). - Secret Keys: RECAPTCHA_SECRET_KEY swapped out for the TURNSTILE_SECRET_KEY in the Cloudflare Pages environment variables settings page.
- Contact Form HTML: HTML changes to the contact form added cf-turnstile-response hidden
<input>and #turnstile-container<div>.
Why change?
So I've literally done a 180 from Google ReCAPTCHA v3 to Cloudflare Turnstile in less than a week. So why change and what are the differences? The top of my priority list that I admittedly should have considered when integrating Google ReCAPTCHA v3 is privacy! I would rather not subject any readers of the blog to any additional tracking from Google! But there are other differences too:
| Area | Cloudflare Turnstile advantage over reCAPTCHA v3 | Why it matters |
|---|---|---|
| Privacy | Turnstile is positioned as a privacy preserving alternative, and it does not rely on tracking user data across sites for ad retargeting. It also offers Ephemeral IDs, which are short-lived device identifiers that work without cookies or client-side storage. | Better fit for teams with strong privacy, GDPR, or public sector concerns. |
| Less operational tuning | Turnstile’s server validation is a straightforward success or failure check. By contrast, reCAPTCHA v3 returns a score and Google recommends that you review scores in the admin console and tune thresholds based on your own traffic, starting from 0.5. | Usually simpler to ship and maintain, especially for smaller teams that do not want to spend time calibrating fraud thresholds. |
| No CAPTCHA experience by default | Turnstile works without showing visitors a CAPTCHA and supports invisible, non-interactive, and managed modes. reCAPTCHA v3 is also frictionless, but Turnstile is explicitly built as a CAPTCHA replacement with more presentation modes for the widget itself. | More control over UX and easier to keep forms feeling clean while still validating traffic. |
| Can be used on any site without Cloudflare CDN | Turnstile can be embedded into any website, it does not require your traffic to go through Cloudflare or use Cloudflare’s CDN. | Easier adoption if you want the bot check without changing your hosting or edge setup. |
| Developer-friendly testing | Turnstile provides dummy site keys and secret keys for testing, and Cloudflare documents that these work on localhost and any development domain. Google’s reCAPTCHA FAQ says for v3 you should create a separate key for testing environments, and scores may not be accurate because v3 relies on real traffic. | Usually a smoother local dev and automated test setup. |
| Free plan positioning | Cloudflare documents Turnstile has a Free plan intended for personal sites, SMBs, dev and test, and most production applications. Google’s FAQ notes quota limits for non-Enterprise reCAPTCHA, and if a v3 key exceeds a monthly quota it may fail open with a static score of 0.9 for the remainder of the month. | Attractive when cost certainty matters or when you want fewer surprises as usage grows. |
| Extra integration option with Cloudflare security stack | Turnstile supports pre-clearance, letting it issue clearance cookies that can be used across Cloudflare protected domains. | Helpful if you already use Cloudflare WAF or bot controls and want tighter integration. |
Summary
Well, that brings us to the end of another blog post, I only went off on a tangent a couple of times! So well done for sticking with my ramblings!
In the end, the goal was to keep the architecture simple while still covering the essentials. The site itself remains fully static, with a lightweight Cloudflare Worker handling form submissions. Spam protection is provided through Google reCAPTCHA v3, Cloudflare Turnstile, while validation and accessibility patterns ensure the form behaves reliably for real users. It is a small piece of functionality, but implemented carefully it can be both robust and easy to maintain.
As always, thanks for reading, and I’d love to hear your feedback. You are welcome to contact me either via the contact form (again, very meta! 😏), or via any of the various social channels listed on the site.
Post changelog:
- 09/03/26: Initial post published.
- 13/03/26: Updates to give instructions on how to use Cloudflare Turnstile as an alternative to Google reCAPTCHA v3. Thanks again to Ryan Townsend and Paweł Grzybek.